
Primary Department Supported: Product Support
Description: How and when to update and modify Loan Templates in the LMS Legacy system so that the correct permissions are added to LMS users.
Super Powers Needed? - NO
Developer Support Needed? - NO
Common Situations
-
Product Support uses Role Templates to assign multiple LMS permissions and roles to internal users in a single action.
-
Updates are commonly required when job duties, titles, or departmental expectations change.
-
Role Templates are still being built and modified in LMS Legacy, not LMS v2.
Important Considerations & Best Practices
-
Always verify the purpose of the Role Template and ensure it aligns with current team responsibilities.
-
When modifying an existing template, consult leadership (Lindsay or Alex) before adding or removing any roles.
-
Reference existing users with correct access when determining which permissions to include in new templates.
-
Use clear, descriptive naming for templates (e.g., “Support Specialist Standard Roles”).
Instructions
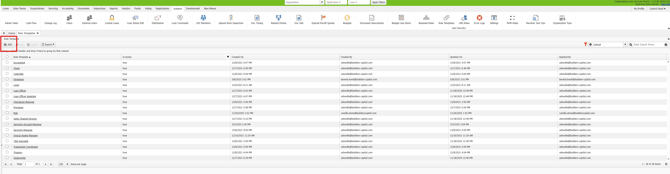
1. Locate Role Templates in Legacy
From LMS Legacy Menu:
-
Select Systems
-
Select Role Templates

2. Add a New Role Template
-
Click Add
-
Enter a clear, descriptive template name
-
Select Save and Continue to open the role selection screen
-
Add Roles and Permissions to the NEW Template
-
Review the list of available roles and permissions
-
Select the required roles by checking the corresponding boxes
-
TIP: Compare roles with existing users or consult Lindsay/Alex for clarity
-
-
Click "Add Selected" to apply the selected roles
-
Select Close to review the full template
-
Click Save and Close to finalize creation
3. To Modify Existing Templates
From Legacy Menu:
-
Select Systems
-
Select Role Templates
-
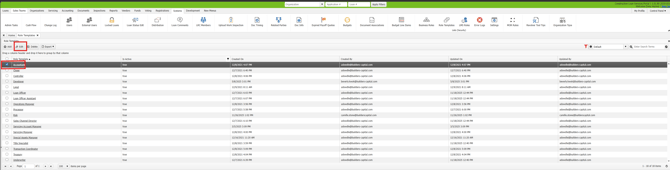
Locate and open the template you need to modify
-
Select the box next to the role needed and select "Edit"
-
To delete a role:
-
Check the box next to the role or permission to remove
-
Click Delete
-
-
-
To add a role:
-
Check the box next to the role or permission to add
-
Click Add Selected
-
Click Close to return to the template overview
-
-
Select Save and Close to finalize changes
Video Example:
Troubleshooting
Unsure which roles belong in a template:
-
Reference an internal user with the correct access or contact Lindsay/Alex for guidance
Template changes not visible:
-
Refresh the Legacy page or re-open the Role Templates area to confirm updates were saved
-
Try adding or removing roles one at a time to make changes easier to review